
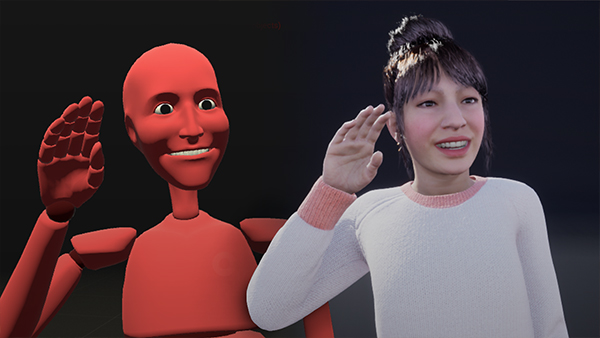
With the release of the early access of the Metahuman Creator, we have had the chance to give it a shot and experiment with the realistic looking models in Unreal Engine. Along with that, we also got to use the Metahumans with the Rokoko Smartsuit and Rokoko Studio’s Virtual Production features. Even though its not perfect, it still turned out a lot better than we had expected. So much so that we decided to make a quick tutorial video showing how we did it. I decided to write this article as a written and more elaborated version of the video tutorial, so I’d suggest you give the video a watch first before reading and this and trying it out for yourself. We hope you will find this useful and/or interesting.
Some Disclaimers: Since we are only working with the early access, the workflow may or may not change when the full Metahuman creator comes out. And because we will be live streaming data straight from Rokoko Studio, we will be working with raw motion capture data, so it will be a bit buggy at times.
Before we start, we should talk about what we will need for this. You can use this as a checklist if you want to try it out for yourself.
Some of these are optional. The Smartgloves are only for finger mo-cap, the Smartsuit will still work without them. The iPhone and Rokoko Remote is only for facial mo-cap, so it is also not needed for the Smartsuit to work. Rokoko Remote’s facial mo-cap utilizes the TrueDepth camera system, which is only present on the iPhone X or newer.
The VR headset, Vive Trackers and Steam VR are only needed for virtual production, so if you are not intending on doing virtual production, it is not required either.
The Metahuman models can be found on Quixel Bridge and can only be downloaded through there. In order to use them, you’ll have to log in with your Epic Games account, the same account you would use for Unreal Engine.
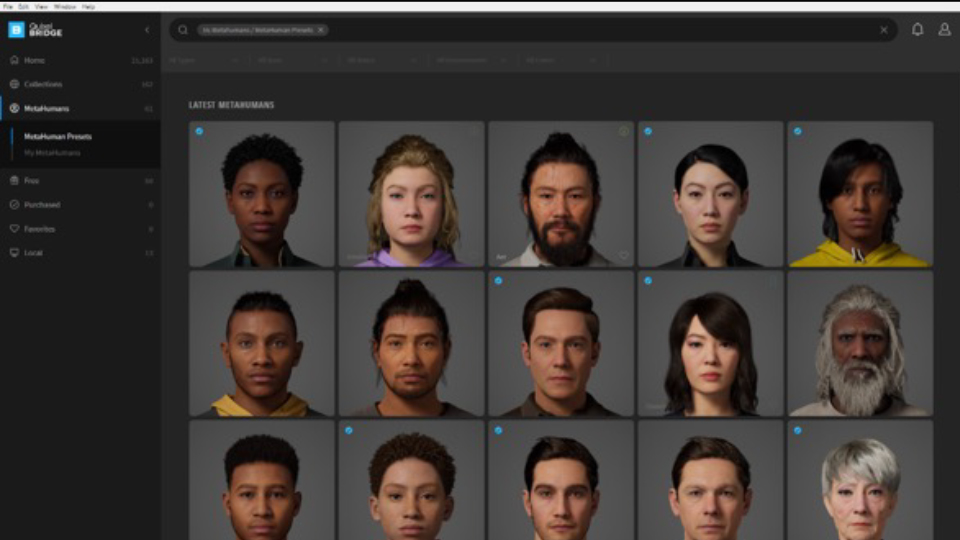
After logging in, you can click on the “MetaHuman” tab and from here, you get to choose from the 50 Metahuman Presets that the team behind the Metahuman Creator has provided. Or if you were lucky enough to try out the Metahuman Creator yourself, you get to download your own Metahuman models from here too.
After you’ve selected your desired Metahuman, you have to go to the download settings, and under the “Models” tab, set the “MetaHumans” dropdown menu to “UAsset + Source Asset” before you download it. The files are quite big (2GB - 4GB) so give it some time to download. You can monitor the progress of your download by clicking on the arrow button in the top-right corner.
After you have downloaded your Metahuman, you might have noticed that the download button is now an export button. Yes, there is a way to export your metahuman directly into Unreal Engine via Bridge. Unfortunately, I was not able to get it to work for myself, so I will be importing them manually. If you want to try it out for yourself, you can check out Quixel’s guide here, and skip this whole section. If it works for you, I’d recommend doing it instead of the manual installation method.
To import them manually, we will have to open our project folder, which is under the “Documents\Unreal Projects” directory by default, unless you’ve specified otherwise. If you are working on a new project, be sure to open Unreal Engine first to create the project folder first, then close it once it is done.
Next go back to Bridge and look for your Metahuman that you had just downloaded. You can find all your downloaded Metahumans under the “Local”, “Metahumans” tab. After selecting your Metahuman, click on the three dots icon and click “Go to Files”.
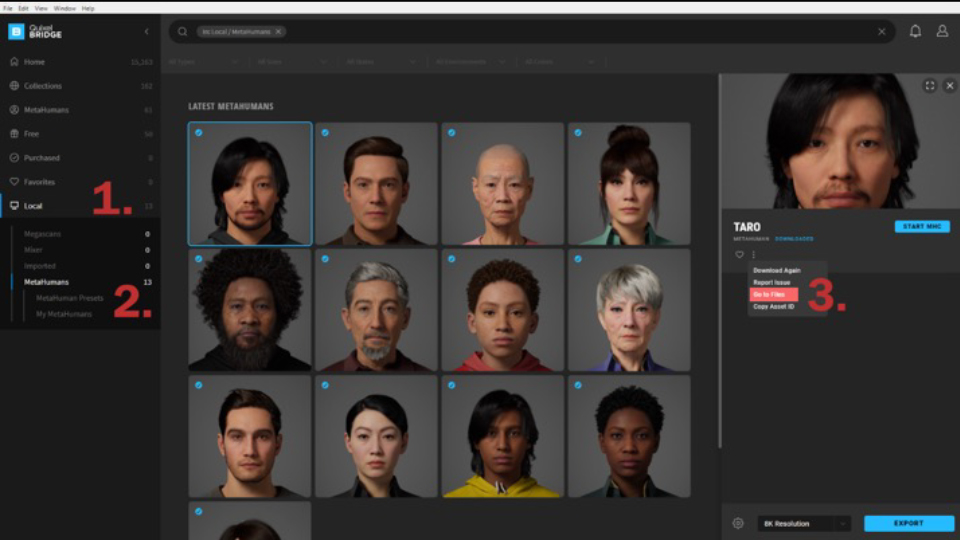
This should open the file location of your Metahuman. Open the folders until you see one just named “Metahumans”. Open the “Content” folder in your project file and copy over the “Metahumans” folder into it.
Do note that if you are installing multiple Metahumans, it would be best to install them together before continuing. If you do decide to install them later, you might have to redo some steps.
Once that is all settled, you can open your project in Unreal Engine. Upon opening the project, you will be prompted to import some files, just click “Import”. You might also get some missing plugin warnings. Ffor those, just click “Enable Missing”. There are a lot of things to import here, so this is going to take a while. And once it is all done, try dragging the Metahuman blueprint into the viewport to check if it looks fine. This usually also takes a while because the shaders take time to compile.
On some Metahuman models, you might encounter an issue where the hair does not render when you get too far from it. This is because the level of detail of your Metahuman adjusts accordingly with the distance it is away from the camera. This is called Auto LOD, and it is very common in games for optimization purposes. But it is not so Ideal if it causes issues like, so we’ll need to disable it.
To do this, click on your Metahuman model, and look for the “LODsync” component in the Details panel. There you should see the Forced LOD value set to -1, which means it is set to auto. Change that number to 0 for the highest level of detail, such that the hair will render. You can try setting it to 1 if 0 is too much for your computer to handle. If everything works out, your Metahuman’s hair should not disappear anymore.
First, we must check if the Rokoko Live plugin is installed. To do this, go to Edit, Plugins, and search for the Rokoko Live plugin. If this is your first time opening the project, it should be installed but not enabled. Enable it and restart Unreal Engine to get it working.
Next, we have to check what body type our Metahuman uses. Since every Metahuman uses a different body type, we have to identify which one it is before we start setting it up. To do this, open your Metahuman’s blueprint, go to the viewport, click on any body part (preferably the hands), and check the name of the skeletal mesh in the Details panel. The naming convention of the skeletal mesh will tell us the body type.
Here are the things to look out for:
For example, in the tutorial video, the skeletal mesh I had was named “f_srt_nrw_body”. From this, we can deduce that the Metahuman I used, had a Female, Short, Normalweight body type. And now that we know the body type, we can look for the animation blueprint that the Metahuman uses in the content browser, by opening the corresponding folders in the common folder.

In the animation blueprint, there should be a button to open the skeleton in the top right corner. In the skeleton window, we are going to make a T-pose pose asset for the Metahuman, because the default pose for Rokoko Studio models is the T-pose, while the default pose for the Metahumans is the A-pose.
Here’s a quick tip: It’ll be a lot easier to navigate through the skeleton using the Skeleton Tree, instead of trying to click the joints in the viewport.
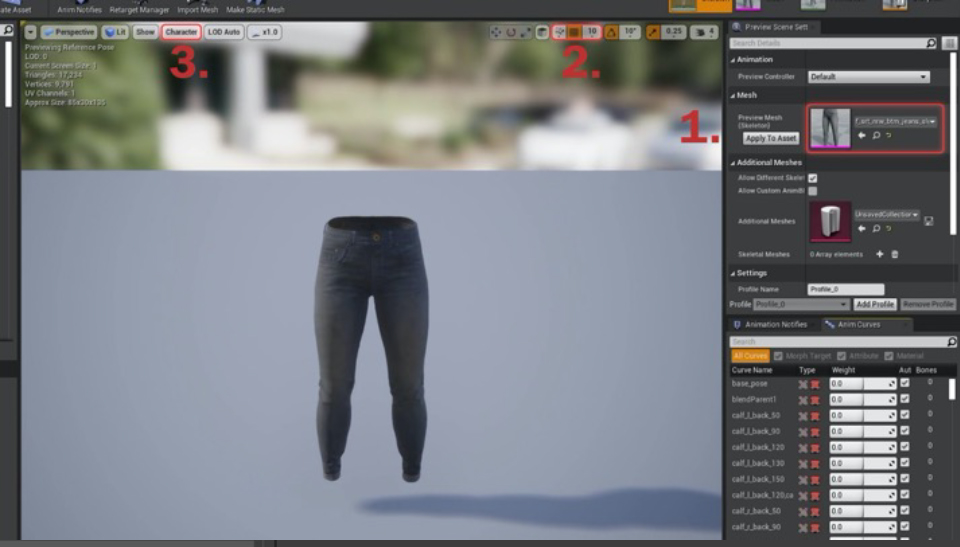
Now we can start with the T-pose. We are going to do this by zeroing-out all the rotation values of the joints that make up the shoulders, arms, hands, and fingers, and then adjusting them a little. For this part, I would recommend watching the video as it helps to have the instructions visualized
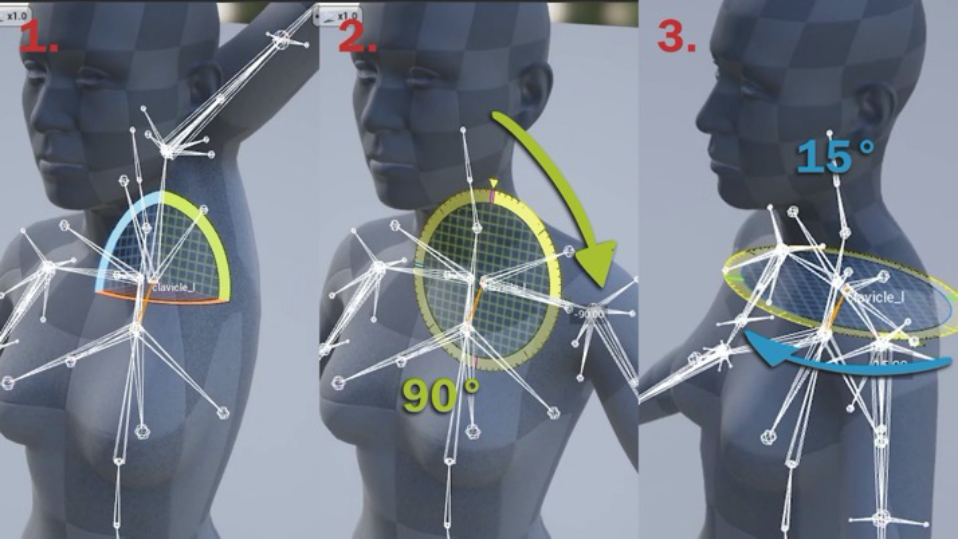
I usually like to start on the left clavicle. We start out by zeroing-out the rotation of the clavicle, then rotating it down to the side by 90°, such that it looks like it did before. In prior tests, we found that the Metahumans had a small issue where the arms would appear to be pushed back. Although this can be easily “fixed”, by rotating the clavicle forward by about 15°.
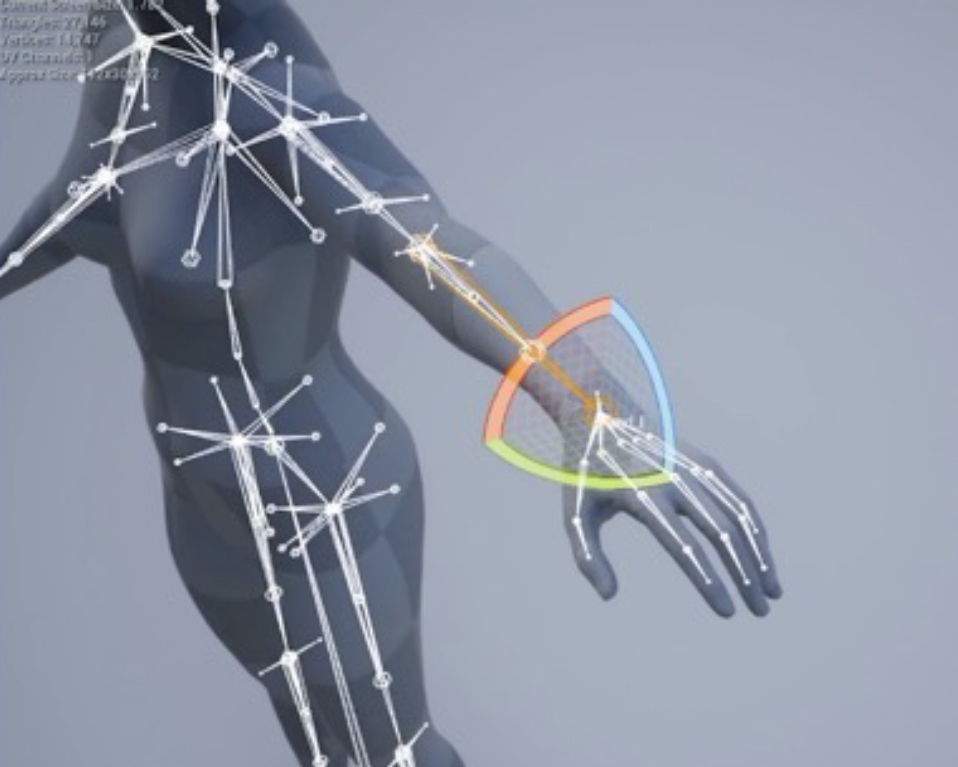
After the clavicle, go down the hierarchy in the Skeleton Tree, and zero-out the rotation of the upper arm, lower arm, and hand. Then rotate the hand joint by 90°, such that the palm is facing the ground. After that, continue going down the hierarchy and zero-out all the joints that make up the fingers.
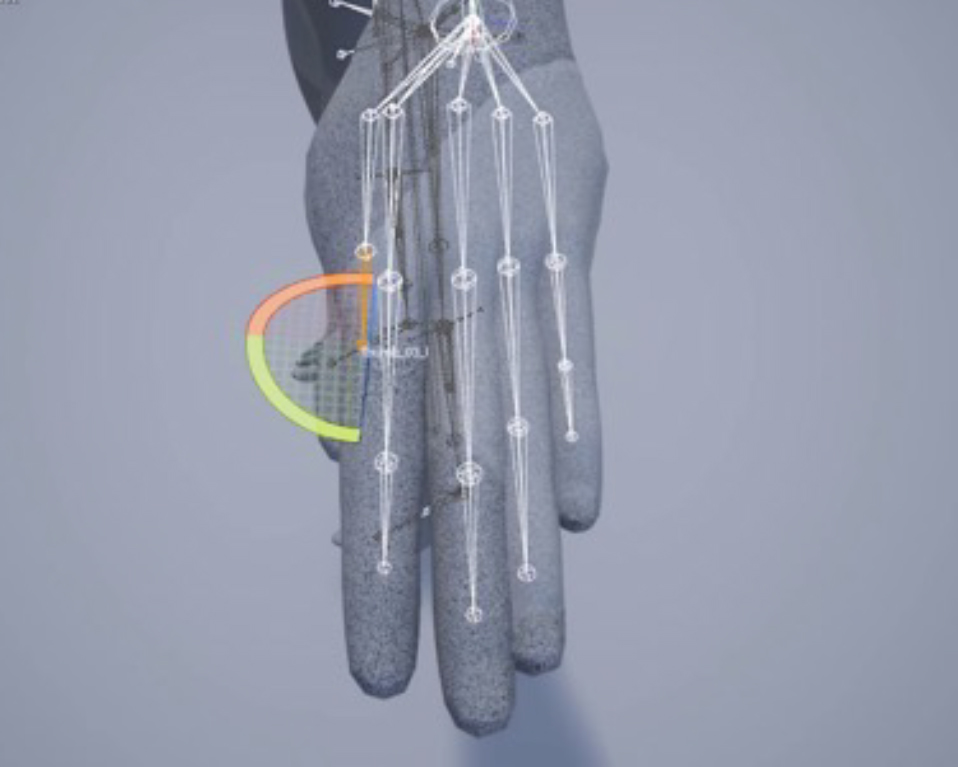
If you have followed the steps correctly, all the fingers should be straight, but clipping into each other with no gaps in between. So now we have to adjust the finger joints to fix that. The fingers will be adjusted in relation to the middle finger, so that means we will not have to touch the middle finger.
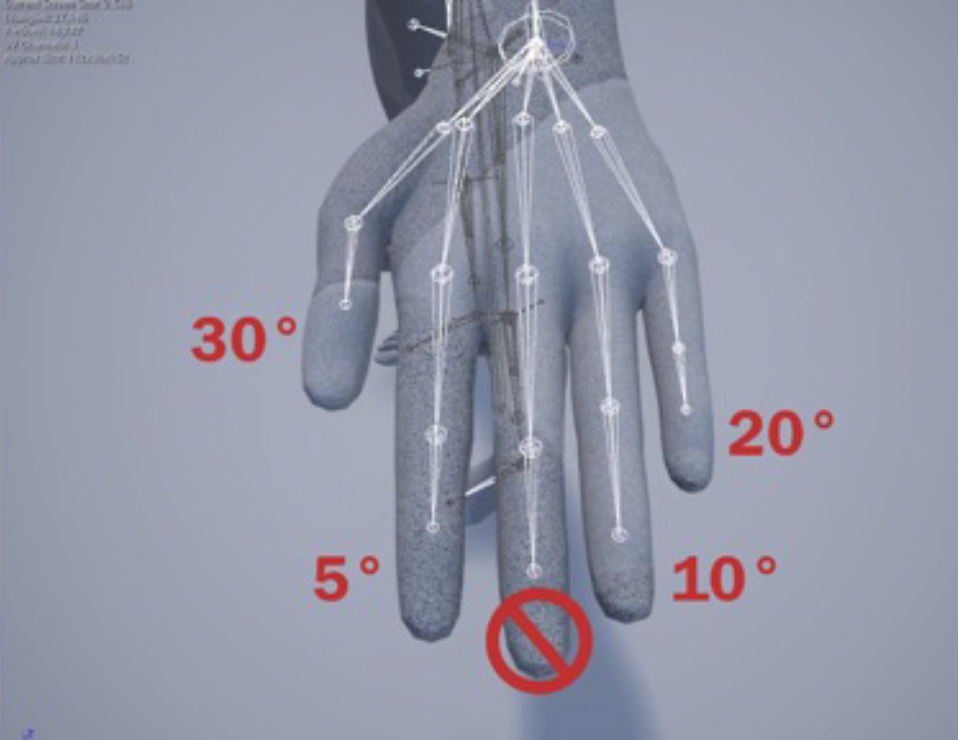
I usually start with the index finger. Select the index metacarpal joint, rotate it 5° away from the middle finger, go down the hierarchy to the next joint and rotate it 5° towards the middle finger to straighten it again. Repeat this for the other fingers too, but at different angles. The ring finger will be 10°, the pinky will be 20°, and the thumb will be 30°. If everything is done properly, the hand should look like this:
Now that it is all done. We will repeat all this again on the other half of the body. The only difference is the right clavicle, where If you zero-out the right clavicle, the whole right arm points down instead of up. So, you’d have to rotate it up first by 180° before continuing as per before. If everything is done properly, you should have a nice T-pose like the one in the image below.
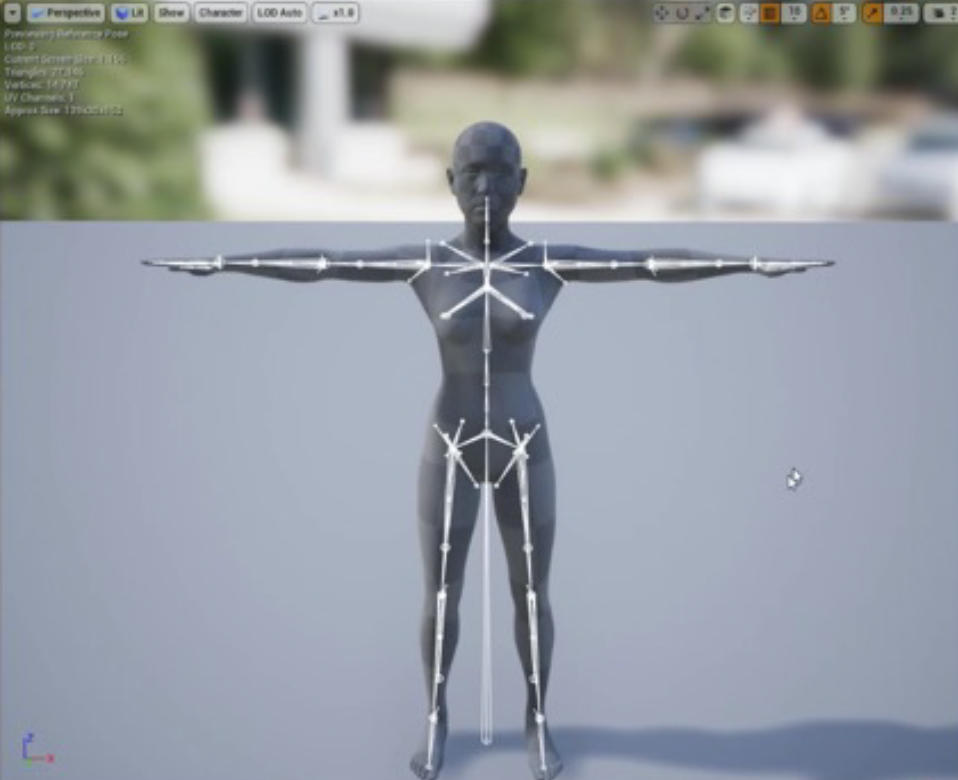
Now, create a pose asset by going to Create Asset at the top panel, Create PoseAsset, and click Current Pose. Save the pose asset somewhere easy to find, as we will need it later.
You can reuse the pose asset for other Metahumans of the same body type.
Now let’s move on. Go back to the animation blueprint and open the animation graph by clicking “Animgraph” on the panel to the left. In there, create a Local to Component node, a Rokoko Body Pose node, a Component to Local node, and connect them all together as per the image below. (You do not have to delete any of the old nodes)
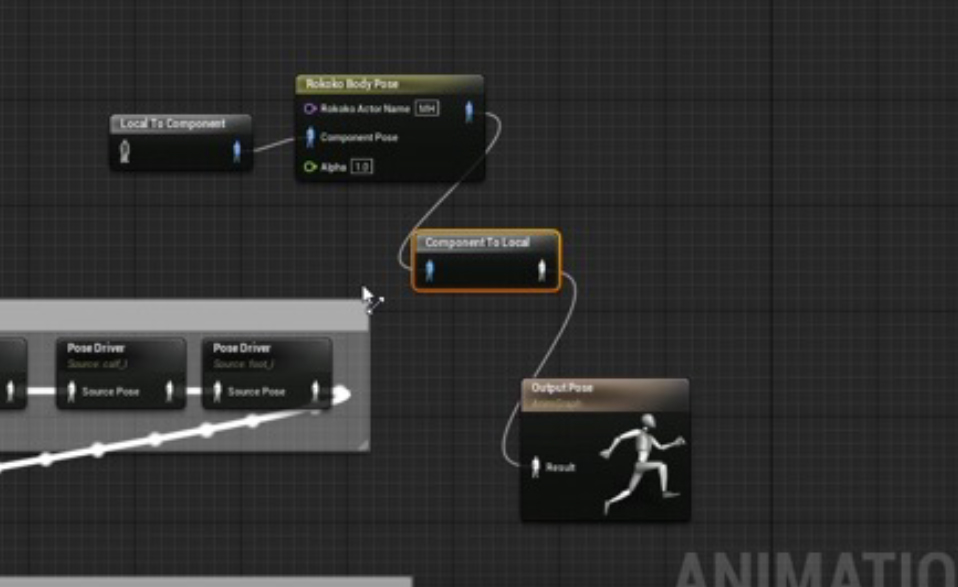
In the Rokoko Body Pose node, enter the name of your actor that you will be using in Rokoko studio. Take note that this is case-sensitive. Then click on the Rokoko Body Pose node again and set the Bone Map Override to the bonelist that you had just downloaded earlier. Now go back to the content browser and look for the T-pose pose asset we created just now, and drag it in. Right click it, click Convert to Pose By Name, and connect it to the Local to Component node.
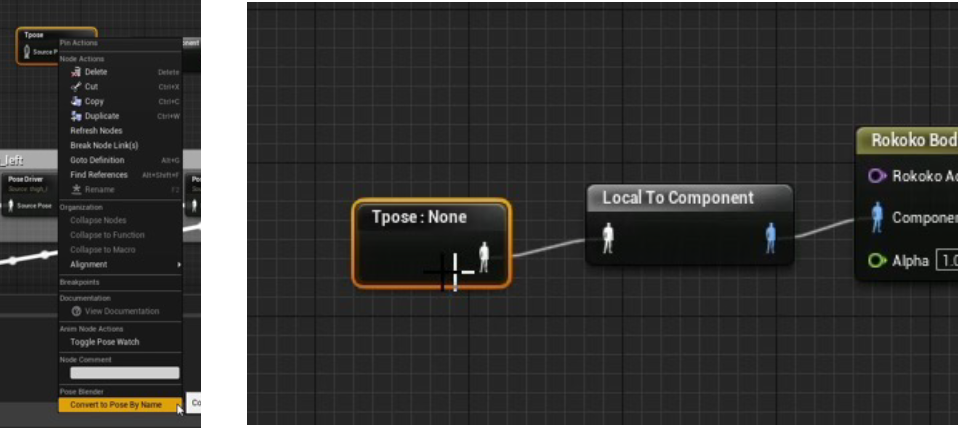
Now open the pose asset (you can double click the node to open it) and look for the pose name. For most people, the pose name should be “Pose_14757”, unless you’ve attempted this before. But it is still best to check for yourself. Then, go back to the animation blueprint and with the pose asset node still selected, insert the pose name in the Details panel.
Finally, compile and save the blueprint, and your metahuman should be in a T-pose now. You might get some error messages in the animation blueprint, but that’s perfectly fine. Your metahuman might also look like its head is a bit higher or lower than the rest of the body, but that’s also perfectly fine. Now the setup is complete.
For this section, Rokoko has made numerous videos and guides on setting up Rokoko Studio, so you can check those out for yourself on their website or their YouTube channel. I’ll still be briefly covering it anyways.
First, create a project and an actor profile. Ensure that it is the same as the name you used earlier in the animation blueprint. Remember to set the height of your actor to the correct height for the best results. Then connect your Smartsuit to Rokoko Studio via a USB C cable and apply Wi-Fi settings. Ensure the IP number is green before connecting. Do the same with the Smartgloves if you have them. A small issue I faced with the Smartgloves is that it would not connect unless I set the DHCP mode to Manual instead of Auto under the advanced Wi-Fi settings. Connect Rokoko Remote if you want to do facial mo-cap. And finally, pair your inputs to your actor.
Now go down to live streaming and turn on live streaming to Unreal Engine. The port number should be visible above. Keep that in mind because we will need it later.
Now we can start Live Linking. First look for a Rokoko Receiver in the Place Actors panel and drag it into the scene. If you can’t find it, you probably don’t have the Rokoko Live plugin enabled, refer back to the “Setting up your Metahuman” section. Click on your Rokoko Receiver and enter the port number in the Details panel.
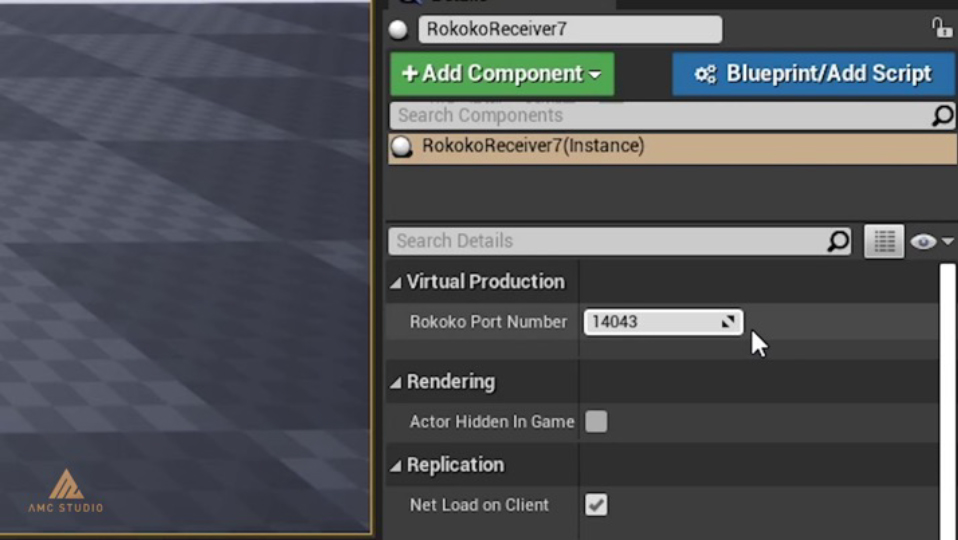
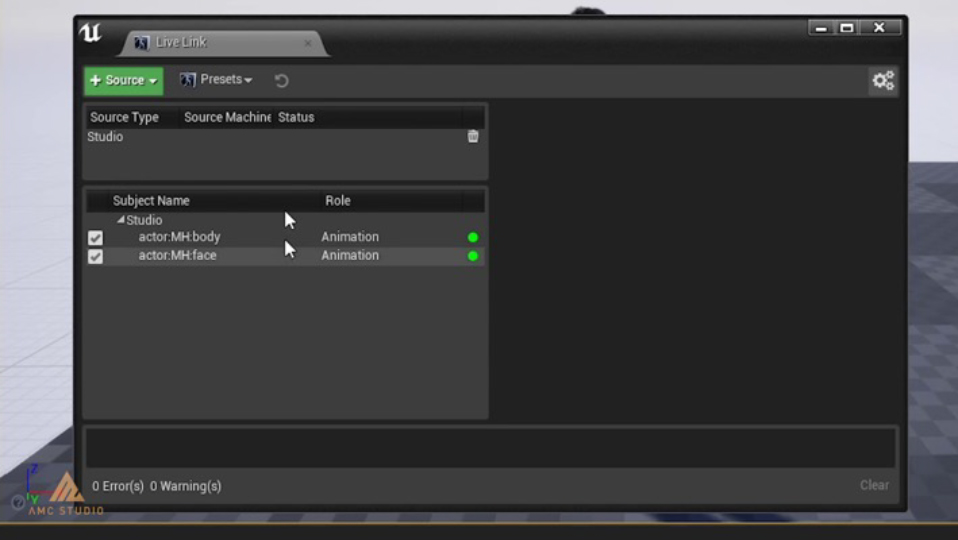
Next open the Live Link window by clicking on Window, Live Link. Click the “+Source” button, go down to Rokoko Studio Source, and click Studio. If Rokoko Studio was properly set up, you should see the inputs appear in the Live Link window.
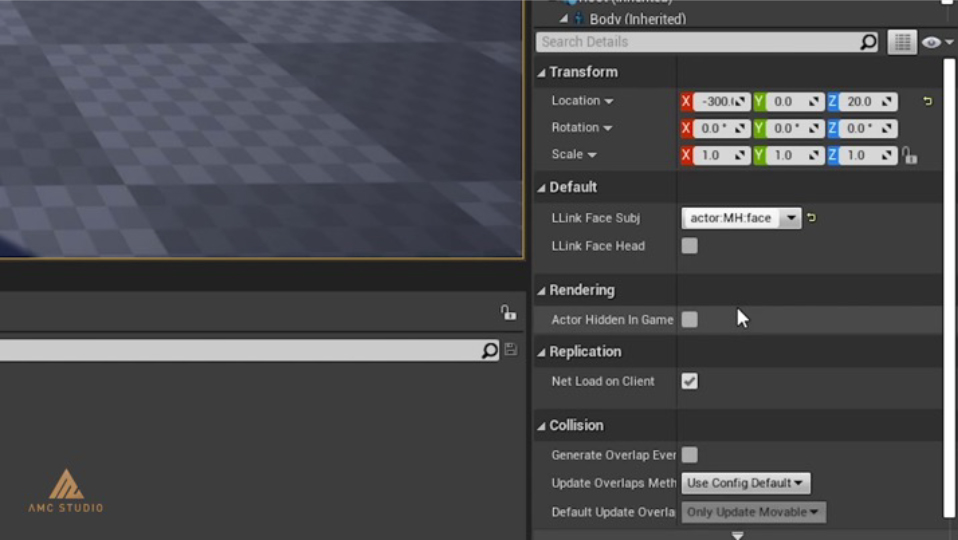
To enable facial mo-cap, click on your Metahuman, select your face actor from the LLink Face Subj dropdown menu, and check the LLink Face Head checkbox.
Lastly, calibrate your Smartsuit in Rokoko Studio. And there you go, now your Metahuman should be controllable by your Smartsuit. Again, this is raw mo-cap data, so some movements might look weird.
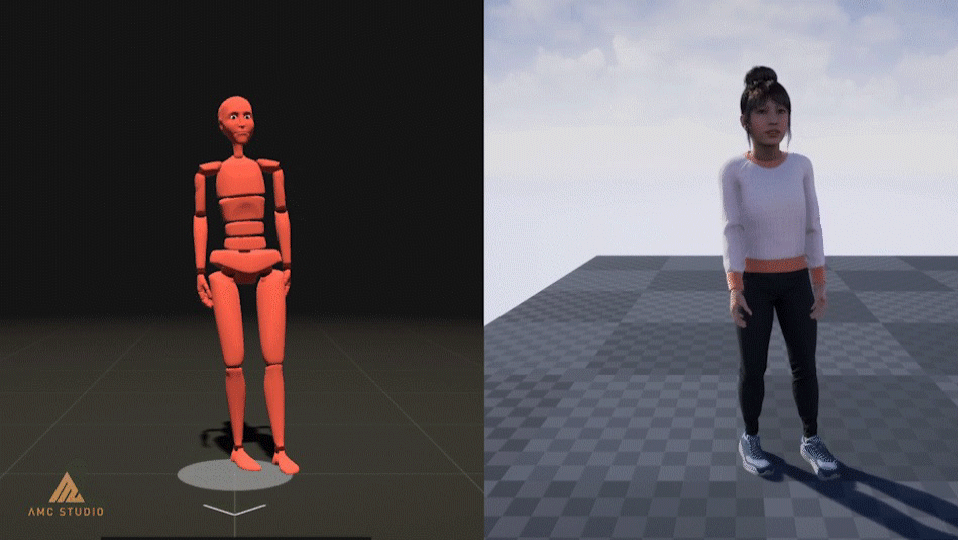
Although if you really need clean mo-cap, you can always record your mo-cap movement in Rokoko Studio, clean up the recordings with filters, and play them back while live streaming is enabled.
Here’s a little something extra. This should have been obvious, but I found out that if you link the same actor to multiple Metahumans. You can have them all move (or dance) in unison. It’s a lot more entertaining to watch than it sounds. Check this out:
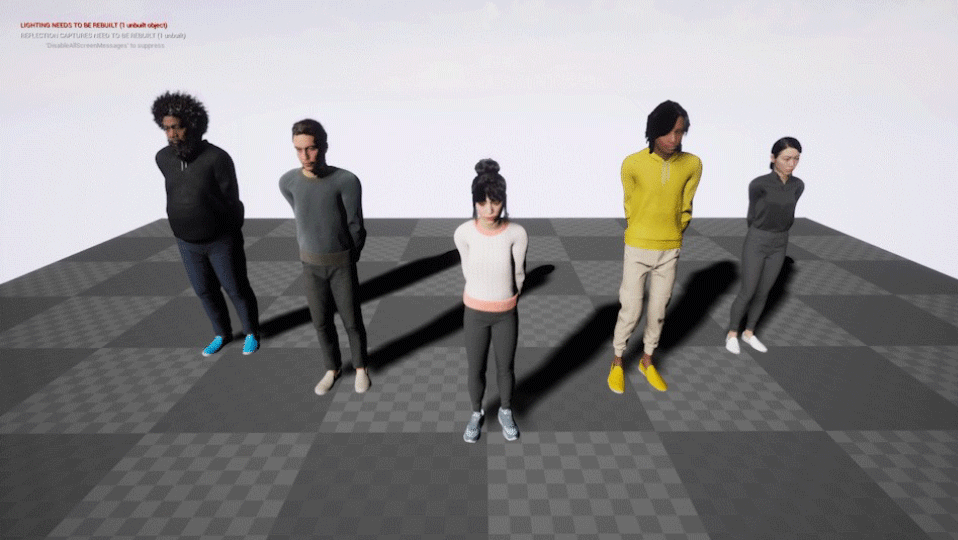 *Metahuman dancing courtesy of my colleague, Yue Ting
But in sum, that is all for the motion capture portion of the tutorial. Next, we’re going to move on to Virtual Production. If you’re only here for the mo-cap stuff, you’re pretty much set from here.
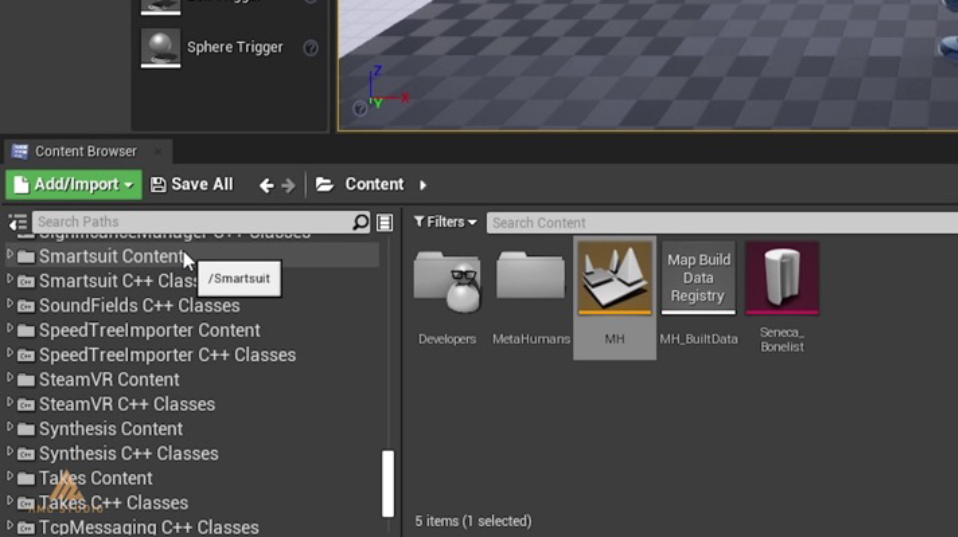
Now we start with the actual virtual production side of things. In Unreal Engine, go to your content browser, click on the View Options button, and check the Show Plugin Content setting if its not checked yet. If it has been checked, you should be able to look for a folder called “Smartsuit Content” in the content browser.
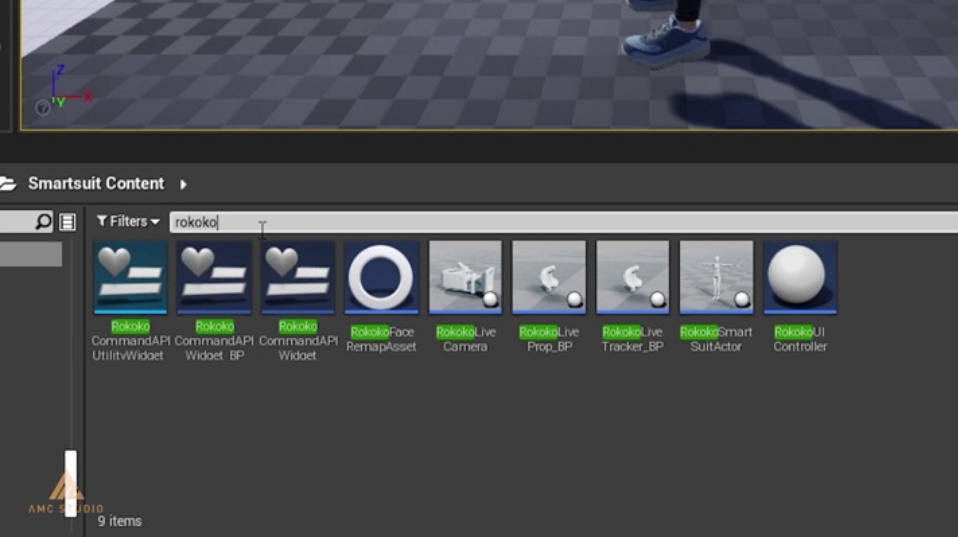
Open that folder, search for a “RokokoUIController” and a “RokokoLiveCamera” and drag it into your viewport. It’s much easier to use the search bar for this. You may also notice there’s a “RokokoLiveProp_BP” there too. That was supposed to be the prop, but according to Rokoko, it does not seem to work at the moment due to a bug. So, we are using a RokokoLiveCamera as an improvised prop until Rokoko resolves this issue.
Now we’ll have to actually make our camera work like a prop. Select your RokokoLiveCamera, and look for the StaticMesh component. Here, you can set the mesh and material of your prop. Transformations to the prop are also best done here.
You should also see a blue camera mesh in your viewport, which is from the Camera component. While it is going to be hidden while the game is playing, it might be a bit annoying and distracting for it to stay there while the game isn’t playing. For a quick fix, I simply changed the Camera Mesh to a very tiny model like the “1x1x1_Box_Pivot_-XYZ”.
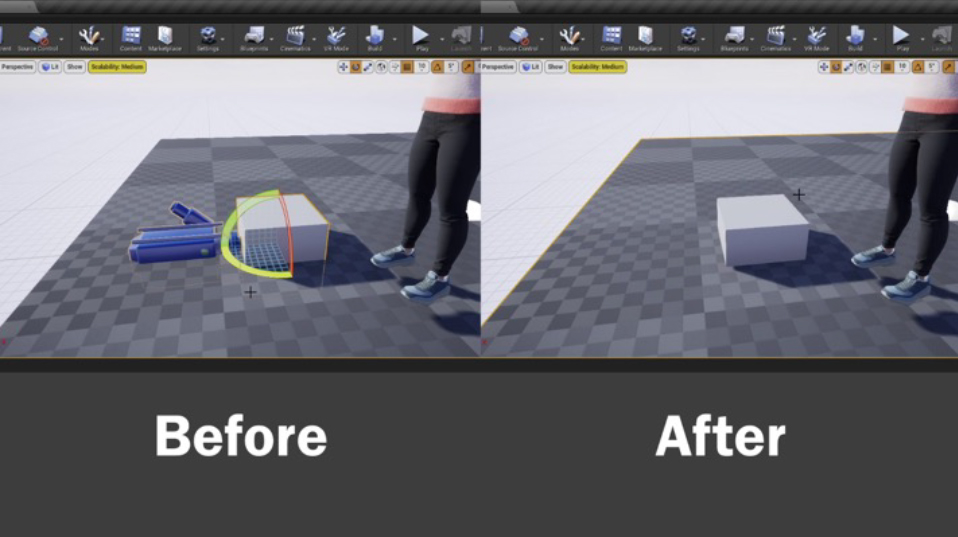
Or if you don’t mind it, you can simply ignore this.
Before we start setting up Rokoko Studio, we have to set up Steam VR first. So, open up Steam VR, and do a room setup. You will be asked to choose between a Room-Scale setup or a Standing Only setup. Choose Standing Only, and just follow the instructions to calibrate your VR headset.

Once that’s done, you can close Steam VR and go back to Rokoko Studio. In Rokoko Studio, open the virtual production tab and click “Start SteamVR”. This should reopen Steam VR again, and you might have to connect your controllers and trackers again. Once SteamVR is up, you should be able to see your lighthouses in the scene. Check if they are in the right orientation, if not, redo the room setup and restart Rokoko Studio.
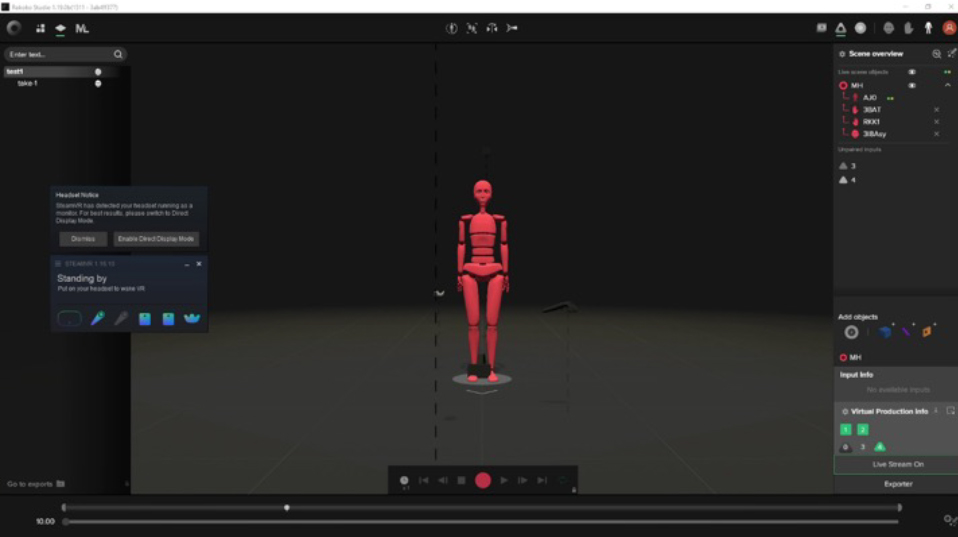
If you try moving your trackers around now, you should be able to see them in Rokoko Studio. Place one on the ground and click the arrow icon in the virtual production tab. That will define the ground level. Then, try adding a camera prop to your scene and pair your tracker inputs to the camera and the Smartsuit.
The tracker on the Smartsuit is important for tracking the position of your actor in relation to the other tracker(s), as the position of the Smartsuit is dependent on where it was calibrated, while the position of the trackers is dependent on where the lighthouses are. So that means that a tracker has to be mount on the Smartsuit. Rokoko has kindly provided a model of a mount to download and 3d-print that can be fit into the back of the Smartsuit as seen below.
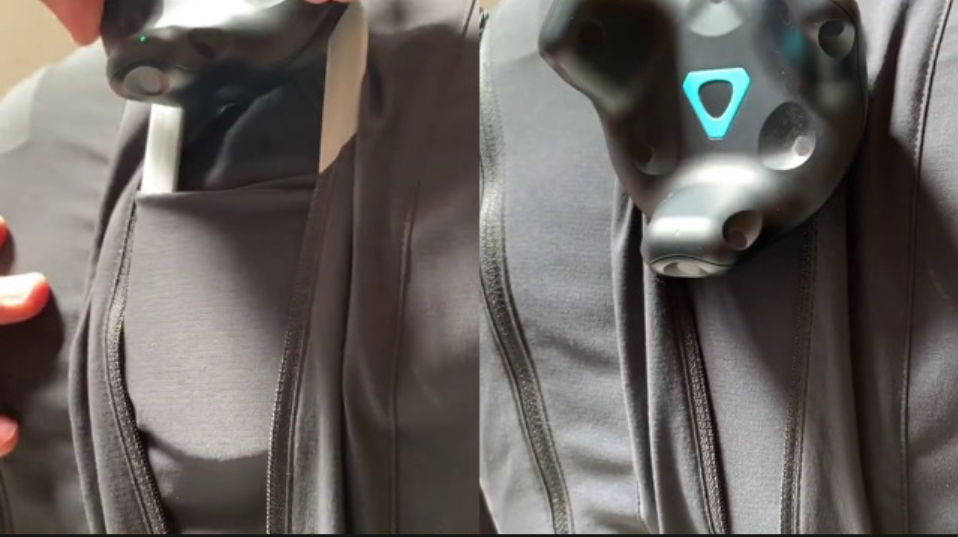 *images from Rokoko Tutorial: Virtual Production Setup
In our tutorial video, we used a DIY setup that was made out of cardboard and string. But I would recommend against that as it is quite inaccurate, get the 3d-printed mount if you can.
Just to mention again, this is only the early access of the Metahuman Creator. We are not sure how much the workflow will change upon the full release of the Metahuman Creator, or if it will even change at all. We will try to make an updated guide if anything changes.
In the meantime, we hope you found this guide useful. If you have any questions, you can drop them in the comments of our tutorial video, and we’ll answer them to the best of our ability. Alternatively, you can check out some of Rokoko’s guides or contact Rokoko Support on their website.
As more details of the Metahuman Creator get released, we will be trying our own experiments with them. Do check out and follow us on social media to keep up to date with our progress on the subject. Good luck with your motion capture projects and/or virtual production projects.